Thursday, November 22, 2007

Guinea Pig Hutch / Hamster Cage DIY

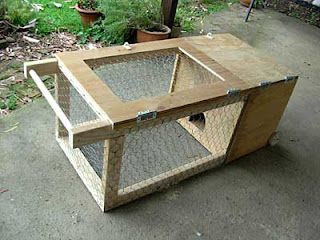
I just finished building a cage for my 7 year old daughter who is getting a new Guinea Pig as a pet. I have never seen the type of cage that was necessary so I had to go by a drawing that my daughter did for me. I couldn't find much information on the web for a DIY cage, but there is plenty on cages that you can buy.

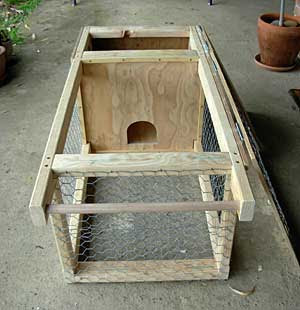
A cage like this being built with a timber frame, plywood walls and galvanised mesh ends up being quite heavy, so I incorporated 2 wheels (old training wheels from an old bike) on one end and a handle on the other so it will be easy to move around the yard as necessary.

My daughter isn't home from school, so I don't know the verdict yet, but here are some pictures of the finished product.


Monday, November 19, 2007

Handyman Website make $120,000 from Google

Here is an interesting story about Jerry Alonzy, an independent handyman who started a website, and added Google adsense onto his site. He now makes $120,000 per year from the ad revenue.


Go to Jerry's site: www.naturalhandyman.com

Wednesday, November 14, 2007

Roof Ventilation and Skylight - In One

Here is a new take on the classic wind powered roof ventilator. The "TurboBeam" incorporates a clear acrylic turbine head that allows light into your attic space. Why use just a standard ventilator when "TurboBeam" does 2 jobs at the same time. This product has been developed by Edmonds. Click here for more info on this product.


Monday, November 12, 2007

Free Solar Hot Water System

Here is an interesting offer by an Australian company called "Earth Utility". Earth Utility will install a Solar Hot Water system, and all you pay is a quarterly Service Fee. Here is an excerpt from the site:


With Earth Utility, switching to solar hot water doesn't cost the Earth!'

Switch to solar and save up to 30% on your energy bills1 and carbon emiss
ions each year.

We offer no upfront purchase or installation costs - an instant savings of $6,000 - $8,000. We supply the entire system (tank, collector and pump) and arrange installation by licensed plumbers.

We own and service the system over the contract term with no future maintenance hassles for you.

All you pay is a flat fee of Less than $1 a day incl. GST

Wednesday, November 7, 2007

Building a Staircase

I came across this fantastic article on building a staircase, on the Home Construction Improvement blog by Todd Fratzel. Doing something like this can be quite daunting for the DIY handyman, but Todd breaks it down into a few simple, understandable steps.

Click here for the article. Here are a couple of Todd's images.

Handyman and DIY Videos

Here's a link to a post on the Charles and Hudson site pointing to a few interesting videos.


This is their post:

Tuesday, October 30, 2007

Building Site Set Out Tip - 3,4,5 Method

A simple DIY tip to determine a 90 degree angle when setting out your building site is the 3,4,5 method. Basically if you mark out a triangle that has sides measuring 3 feet, 4 feet and 5 feet (or metres) you will end up with a right angle triangle. This is a very simple solution that can be handled by just one handyman, a tape measure and some pegs.

NOTE: Keep in mind that the measurements can be multiples of 3,4,5. You can use 6,8 and 10 or 9, 12 and 15 etc.

Saturday, October 27, 2007

Must Have Tool Tip - The Plumb Bob

A simple tool that was even used back in ancient Egypt to build the pyramids, the Plumb Bob uses gravity to establish "plumb" or exactly vertical. The tool is simply a string with a pointed weight on the end. By holding (or fixing) the line on a high point and dropping the line so the weight is close to the ground you will establish an accurate vertical line from one point to the other. This example from Tajima (click here for more info) shows a more elaborate example with a retractable line and also a magnet to be used on metal surfaces and a pin to help with timber.


Here is an image that I found on the "thisoldhouse.com" site
 showing one of these plumb bobs being used by a handyman to help fit a door frame.

Tuesday, October 23, 2007

Must Have Tool Tip - The Water Level


One of the cheapest and accurate tools that a handyman will own. A water level is simply a length of clear, flexible tubing filled with water. The one I have is 10 metres (32')  long with a 10mm (3/8") diameter.

This type of level works simply with gravity. You will find that water will naturally, and acurately level itself. The height of the water at both ends of the tube will always be level - the length of your tube is your only restriction. Warning - you must check that you have no air bubbles at all in the water for acurate levels.


NOTE: Here is something I have never heard of... an Electric Water Level (image on right). This seems to work exactly as above but has audible tones to indicate levels. This product is by Zircon Corporation. Click here for more info.

Monday, October 8, 2007

Ozlogs - Timber look, Concrete durability

Thinking about a DIY backyard renovation. Here is an alternative to timber sleepers and posts when you are after that natural look to your landscaping. These Australian made "Ozlogs" are made from concrete reinforced with steel, and yet have that natural timber sleeper look about them. No more having to replace your posts or retaining walls due to termite or water damage. 


Get more info from the Ozlogs website.

Thursday, September 27, 2007

Andy the handyman - DIY disasters compilation

Talking with a friend today about DoItYourselfer's and some of the pain and injury they can cause themselves. But it can at times be very funny.

Tuesday, September 25, 2007

Power Tool drag Races - WOW


This is amazing. I never knew the full capabilities of a man and his power tool. Check out these links to some pics and video:

Sunday, September 16, 2007

Rapidrench - Adjustable Ratcheting Socket


There have been many new tools released that promise to replace multiple tools in your workshop, but this one - the Crescent Rapidrench -  looks like it can do just that.  This one tool can (to a certain extent) replace a complete socket set. Here are some spec's:


  • 7/8" adjustable jaw opening to accommodate 38 different bolt/nut sizes
  • R2 RapidRench works on various fasteners and sizes
  • Jaw design extends into deep areas
  • Tool exceeds ANSI specs
  • Comfort grip for reduced stress on hand
  • Chrome finish for durability and corrosion resistance
  • Reversible ratcheting mechanism
Click here to read a review on Bob Villa's site.

At the moment this new tool seems near impossible to find here in Sydney, Australia.

Thursday, September 6, 2007

Sheds, Tools and Stuff

My first post and first attempt at blogging. I'm not exactly sure where this blog will lead. I'll probably make this up as I go along. 


I am in the animation and design industry now, but started my working life as a carpenter. I did my apprenticeship with my dad, and moved on into building and construction. Even though I now spend most of the day behind a computer, I never completely put away the tools. From helping out on extensions and renovations, building a pergola for a mate, or just simple repairs around the home. After completing these projects, there is a certain sense of satisfaction that doesn't exist in any other field that I have experienced. If you have ever attempted and completed a DIY renovation yourself, you'll know what I mean.

Thanks for stopping by. Steve